Introduction
A risk assessment is the process of evaluating the potential risks that may be associated with an activity. When performing a risk assessment, it is important to note the difference between a hazard and a risk. These terms are not interchangeable. A hazard is an intrinsic property of a substance or condition that can result in potential damage or harm to an individual or thing. It cannot be truly removed. A risk however, is the probability that exposure to a hazard will result in an adverse consequence, and the severity of that consequence. The risk equation is written as follows:
Risk level = probability of exposure to a hazard x severity of the hazard.
A hazard cannot be reduced, it can only be eliminated. However, the risk associated with the hazard can be reduced. While the risk can rarely be reduced to zero without eliminating the hazard, proper risk management can reduce the risk to a level acceptable to the researcher and institution.
The steps of a risk assessment can be summarized in the acronym RAMP:
- Recognize the hazards
- Assess the risks
- Mitigate the risks
- Prepare for emergencies
Recognize the hazards
This is the first and most crucial step in a risk assessment. For a proper risk assessment all hazards of a procedure must be recognized. This includes hazards of the materials, equipment, and processes.
Most chemical hazards are identified in the safety data sheet. It is important to consider health AND physical hazards and to pay attention to the physical properties, such as boiling point, flash point, vapor pressure, etc. to fully understand how the hazards can affect you. Besides the hazards of an individual chemical there may be additional hazards resulting from mixing chemicals that undergo wanted and/or unexpected reactions. Refer to sources listed under Planning Chemical Reactions at the bottom of this page.
For new experiments and/or inexperienced lab workers, recognizing all hazards may not be an easy task. Perform a literature search and consult with your supervisor and researchers experienced in the field to help you identify the hazards. You may be the only one carrying out the experiment but planning it is a team effort.
Assess the risks
Once the hazards are identified, evaluate what the risks are for an exposure or incident. Assess how likely a negative event is to occur and how severe the outcome could be. This step will always be somewhat subjective and depend on a person’s experience in the field. Risk assessment tools have been developed to provide guidance and to make the process more objective. Some tools use numbers to semi-quantitatively calculate the level of risk and assign risk levels. One commonly used tool is the risk matrix. The risk matrix plots the probability of adverse consequences versus the severity of that consequence. The resulting fields are assigned risk levels from low to unacceptable:

Risk levels: Green-low; yellow-moderate; red-high; black-unacceptable. (*Procedures with frequent failures should be evaluated even though there may be no safety concern. Any critical outcome should be evaluated even if probability is low.)
The risk matrix is used in the Failure Modes / Effects Analysis (FMEA) tool to assess the risks of potential failures that could occur during a procedure. Look at each step of the procedure and determine what can go wrong. Evaluate each failure by ranking the probability of it occurring and the severity of the outcome according to the following table:
Probability | Severity |
1= Extremely Unlikely | 1= No effect on personal safety |
3= Remote (few failures) | 4= Minor effects, no injuries but maintenance action required |
5= Occasional failures | 9= Light injuries (first aid type), equipment damage |
7=Reasonably possible (repeated failures) | 16= Heavy injuries (medical attention required) |
9= Frequent failures, failure inevitable | 25= Critical. Medical attention and severe lost time injuries. Heavy equipment damage |
49= Catastrophic. Fatality, equipment destruction |
Multiplying the two numbers indicates where the risk falls on the risk matrix. Any failure that can result in “critical” or “catastrophic” consequences requires further review regardless of the overall score. Any score above 63 requires further evaluation of the process to lower the risk. Moderate risk should be evaluated to determine if the risk can be lowered.
While the FMEA is a useful tool for any process, the Laboratory Risk Assessment Tool (LabRAT) developed by Midwest Chemical Safety is particularly useful for procedures involving chemicals on a laboratory scale. It looks at the overall risk of a procedure and takes into account the hazards of the used materials, their amounts, process conditions, engineering controls, experience, and availability of a written procedure. For each category you select a number between 0 (no risk) and 5 (high risk). The tool provides guidance as to what number to pick. The overall risk is calculated by adding up all numbers. The risk levels are described as low, moderate, high, and extreme. If the numbers add up to a high risk, the procedure needs to be modified to lower the risk. You can find an example of a filled out LabRAT form here: example LabRAT
Look at the “Front Page” tab first to see a description of the procedure. Then click on the “Back Page” tab to see the categories and assigned numbers.
Whether you used a tool or assessed the risk informally in your head, you need to decide if the risk level is acceptable. For any activity that could result in serious injury, this is not simply your personal decision but must involve your supervisor.
Mitigating the risks
Generally, any process of moderate risk should be evaluated to see if the risk can be reduced. Any procedure of high or unacceptable risk must be modified to lower the risk. The risk can be lowered by reducing the probability of the event occurring or by mitigating the severity or that event. The following measures are commonly used to control risk:
Generally, any process of moderate risk should be evaluated to see if the risk can be reduced. Any procedure of high or unacceptable risk must be modified to lower the risk. The risk can be lowered by reducing the probability of the event occurring or by mitigating the severity or that event. The following measures are commonly used to control risk:
- Elimination/Substitution
- Use a different method or material if possible
- Engineering Controls
- Guards and shields for moving parts and electrical connections
- Placing the material or process in an enclosed system
- Isolating the hazards
- Chemical fume hoods
- Biosafety cabinets
- Administrative controls
- Working alone policies
- Standard Operating Procedures
- Additional training
- Warning signs
- Hygiene practices (proper glove removal, washing hands, etc.)
- Housekeeping
- Personal Protective Equipment
- Eye/face protection (safety glasses, goggles, face shield)
- Protective clothing (gloves, lab coat)
- Respirator
- Hearing protection
Follow the hierarchy of controls and use the most effective control that is technically feasible and reasonable for the situation.
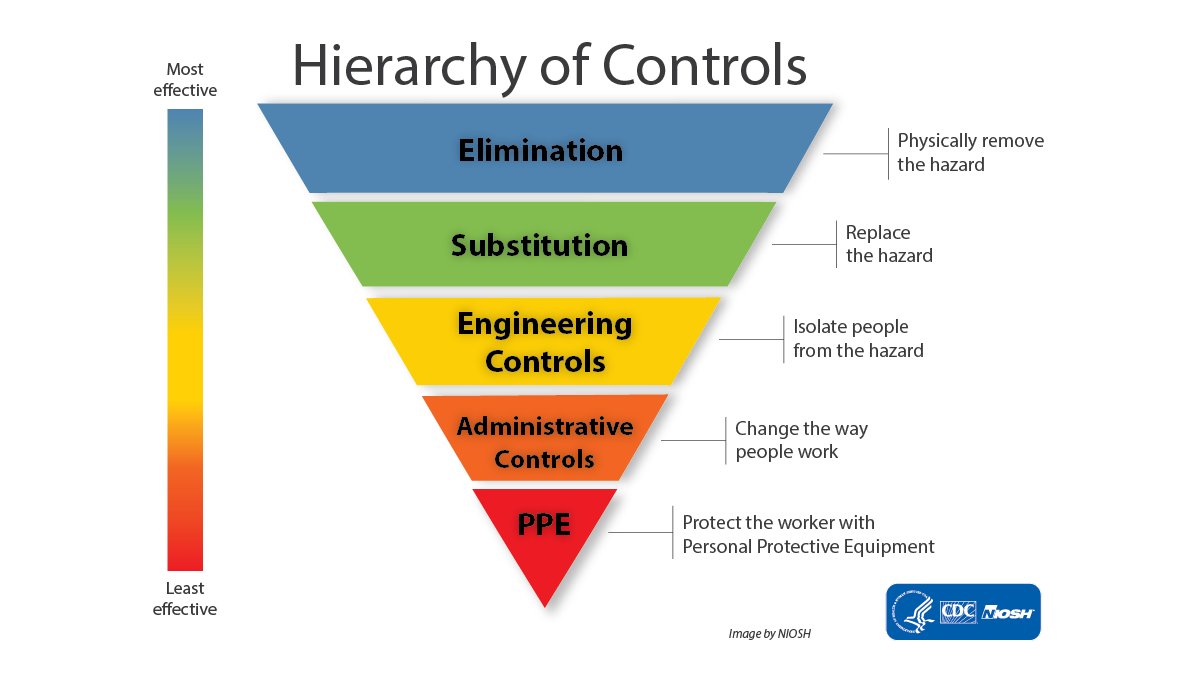
Source: http://www.cdc.gov/niosh/topics/hierarchy
Even though PPE is listed as the least effective, it should absolutely be used. It is there in case one of the other control measures fail.
Preparing for Emergencies
Adequate risk mitigation strategies should prevent most serious emergencies, however, fires, injuries, or unexpected power outages can still occur. It is important to have a plan in place for how to respond to emergencies. The plan should include how processes are affected by a power outage, how to shut down critical equipment for a building evacuation, how to respond to a fire or a spill, where to seek medical attention, who should be informed, etc.
Not all risk assessments need to be written. Once you are familiar with the process, it can be done informally. However, it is important to cover all hazards and thoroughly assess all risks. This information is then used as the basis for SOP development. The identified hazards, risk mitigation strategies, and emergency planning should be addressed in the SOP.
Risk Assessment Tools and Resources
A variety of resources exist that can be helpful in performing a risk assessment. Depending on the type of experiment under consideration, some may be more useful than others.
General Risk Assessment Tool
Failure Mode Effects Analysis Work Sheet
Biological Risk Assessment
Although the focus is infectious material, Section II from Biosafety in Microbiological and Biomedical Laboratories (BMBL) 5th Edition provides an excellent overview of the principles of risk assessment.
Biological Safety: Principals and Practices, 5th Ed. p 95-104. Chapter 5 “Risk Assessment of Biological Hazards”
World Health Organization Laboratory Biosafety Manual, 3rd Edition
Chemical Risk Assessment
DRS Risk Assessment Tool for Chemical Experiments
The worksheet provides a step-by-step approach through the process of risk assessment for experiments involving chemicals.
Laboratory Risk Assessment Tool (LabRAT) Worksheet
Prudent Practices in the Laboratory: Handling and Management of Chemical Hazards, Updated Version 2011
The American Chemical Society provides several resources to assist with hazard identification and risk assessment. These focus primarily on chemical hazards, but the concepts can be extended to other hazards as well.
Identifying and Evaluating Hazards in Research Laboratories
ACS Risk Assessment and Rating Tool
Planning Chemical Reactions
NOAA Chemical Reactivity Worksheet
The NOAA Chemical Reactivity Worksheet is a free program that can be used to find out about the chemical reactivity of common hazardous materials. This was developed by the EPA, NOAA’s Office of Response and Restoration, and the American Institute of Chemical Engineers Center for Chemical Process Safety, among others.
The NIST Chemistry WebBook provides a variety of resources regarding chemical information, including thermochemical data.
This reference work provides information on chemical reagents and catalysts useful for planning organic syntheses.
Bretherick’s Handbook of Reactive Chemical Hazards is a compilation of information on hundreds of chemicals and chemical groups and their reactions and incompatibilities reported in the literature.